Braiding a Piece of Hemp Jewelry – The Monk’s Braid Knot January 22, 2009
Posted by Rock One in Techniques.Tags: beads, crafts, Handcrafted, hemp, hemp crafts, hemp jewelry, hippy, jewelry, jewelry making, macrame, Techniques
trackback
The monk’s braid is a knot that I just recently stumbled upon and tried out. From what I gathered, its origins come from the belts of Oriental monks. It’s a pretty cool macrame knot that produces a very stretchy, round, almost rope-like necklace. It looks something like this (don’t mind the beads, I was just playing with different ways to put them on the neckace):

This knot looks pretty complicated, but once you’ve successfully tied it just a few times, it’s relatively easy to do. You’re going to need to cut your cords and tie your starting loop. This one will be done a little differently than you are used to: you will be working from the top of the knot rather than the side. Sit with the knot between your knees. I was going to take pictures for this one, but in all honesty it is much easier to understand when demonstrated in Paint. Set your cords up like this:
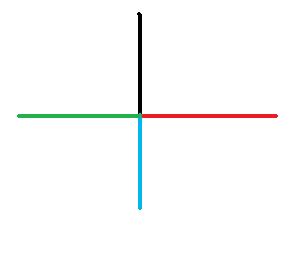
Now, take the top cord, loop it around and over the cord on the right, like this:
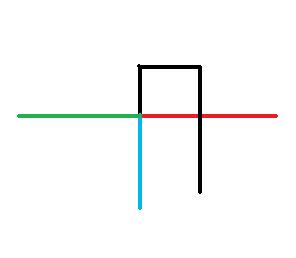
Then, take the cord on the right, and go over both the top and bottom cords:
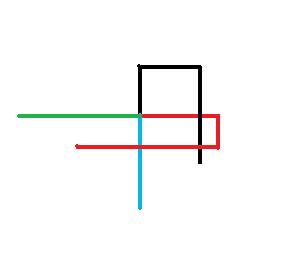
Keep working clockwise like this, always going over all other cords:
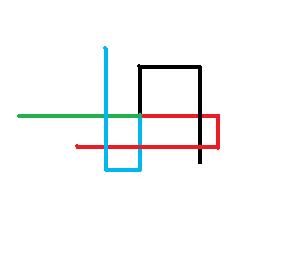
Now, when you get to the last cord, you are going to go over the top cord, then under it, like this:
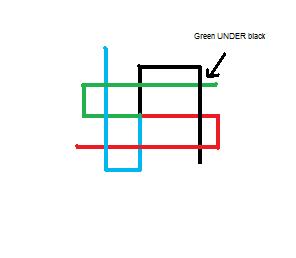
Once your cords look like the picture above, tighten them all by pulling on opposite cords until the cords form sort of a square. Once tight, repeat all the steps again. While this is a fairly simple and cool looking knot, I quickly learned that it takes forever to make a piece of jewelry using it. Worth it, in my opinion, but that’s just me. Probably the simplest way to add a bead would be to just put all four cords through the bead, then continuing knotting. However, I used really thick hemp on this one, and I learned that it looked kind of cool when you put one small bead on each of the four strings, then continuing to knot. Another good thing about this knot is that it doesn’t matter where you start off, because it will turn out exactly the same despite which order you overlap the cords.
This is a pretty unique knot, and I have not seen much (if any) jewelry made using it. Give it a try, and see what you think. Let me know how it turns out. Good luck.
The length of cord needed is not mentioned.
As far as length, you’re going to need a little bit more than other knots. I would say add an extra foot or two from what you would normally use to make a necklace. Just an estimate, but I would say about four to six feet. It’s better to start off with too much than to not have enough to finish the piece.
i was looking on the computer for a knot,i was about to give up and saw yours,it took a couple times ya,got it.thank you
This came out wonderfully. Very easy too. Intructions via paint = great idea. Thanks a bunch!
so do u only use 4 strands?? and all the same length?
i love this knot. got it the first time i tried it thanks to paint. 🙂
please put more braids up. :
thanks!
isnt this the same as making a lanyard? but with hemp..
very cool(:
Very cool knott. Easy to read instructions and awsome detailed pics! Nice work.
It really doesn’t matter how many strings you use, I’ve done it with up to eight. It was a little hard to handle though, with so many strings, especially since I usually wrap the strings around my fingers to keep them seperate… But it is possible. The result is thicker the more strings you use.
Looove It !! Super easy and very pretty 😛
I did see 1 question than I couldn’t find the answer, according to your diagram there are 4 different colors used in the paint diagram. I’m just wondering about the layout, it looks like you have 4 different lines, in a + configuration tied in the center. Please let me know if that is the way or is it 2 crossing lines. Either way it’s a coil design.
Thanks again please let me know.
Eric Michaels
cartmanx8542@gmail.com
It was becoming difficult for me to keep track of which cord was which, so I used different colored ball pins (I don’t know the actual name, they’re little pins with colored balls at the end) to pin them down with the corresponding color in the diagram. Thought I’d share this idea for anyone else having trouble keeping track in case they were mixing up their cords.
This is a great knot. i have used it to make lanyard. you can also make thicker ones just by adding more cord i.e 3 total to make 6 strands, 4 to make 8 and so on.
I don’t even know how I ended up here, but I believed this submit used
to be good. I don’t recognize who you might be however definitely you are going to a famous blogger when you are not already.
Cheers!
Very good write-up. I certainly appreciate this website.
Stick with it!