Braiding a Piece of Hemp Jewelry – The Josephine Knot or the Pretzel Knot February 2, 2009
Posted by Rock One in Techniques.Tags: beads, carving, crafts, Handcrafted, hemp, hemp crafts, hemp jewelry, hippy, Ideas, jewelry, jewelry making, macrame, photos, pictures, Techniques
5 comments
The Josephine Knot (or the Pretzel Knot, as it’s oftentimes known) is more complicated than your basic square knot, but it can give a pretty sweet effect to a piece of jewelry. You can also make a piece of jewelry using solely this knot (I don’t personally like the way this looks, but it’s all up to you). Take a look at my other posts, and mix and match techniques and other ideas. Here is what this knot will look like:

First of all, these instructions will only cover tying the Josephine knot. It’s up to you to figure out how to use it in your jewelry. However, it looks just as good using four cords, seperating the two leftmost and the two rightmost cords and treating each pair as a single cord. You will only need two pieces of hemp cord for this knot instead of the usual four. Bear with me, as they are terrible pictures I made in Paint, but it gets the job done. Not an incredibly hard knot to figure out. Just follow these pictures in order:


In the last picture, I changed a portion of the red line to blue to indicate which end of the cord goes under which. Holding the top of the cords, tighten the bottoms simultaneously. The knot should look like a pretzel. That’s it. Go ahead and try it out. Let me know if the pictures aren’t enough to figure it out. I can take some actual pictures, or a video. Good luck.
Make Your Own Wooden Kanji Beads January 29, 2009
Posted by Rock One in beads, Hemp Jewelry Supplies, Ideas, Make your own.Tags: beads, carving, crafts, Handcrafted, hemp, hemp crafts, hemp jewelry, hippy, Ideas, jewelry, jewelry making, macrame, photos, pictures, Techniques, woodworking
2 comments
If you’re like me, and sick of all the same generic beads floating around on everyone’s hemp necklaces, here’s a relatively easy (and very cheap) idea that will help you make your own.
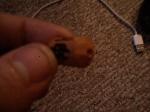
First of all, I’d just like to throw it out there that I am by no means a good woodworker. Or a woodworker at all, for that matter. I just thought this one up and tried it out, and it actually turned out really cool. Here’s a picture of the finished product (as is the case with many of my pictures, please excuse the fact that they are not good. I took them with my phone, and some are pretty badly lit):

First off, you will need just a few things. You might already have some of these, but if you need to go out and buy them, it won’t cost much at all:
- Wooden dowel (these cost a matter of pennies at your local hardware store. Literally. Less than a dollar)
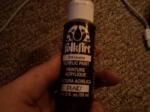
- Paint (any color, but make sure that it is for use on wood. The kind I used was less than a dollar a bottle. You can find it at Wal Mart or your local craft store)
- Carving tools (or just a small, durable knife. I got a set of about six carving tools at Wal Mart for less than five bucks)
- Toothpick (or anything small enough to do detail paint work on your beads. Personally, I carved down the handle of one of the cheap plastic paint brushes I was using. Worked just fine)
- Paintbrush (you probably don’t even need a paintbrush, just something to put paint over your beads. I would imagine that you could just wipe it on with a paper towel or something)
- Drill with small bit (or some other means of putting a hole in the middle of your beads. I own a Dremel tool, which cost me about 75 dollars. However, there are some models that are as cheap as thirty. You may already have a drill of some sort laying around with a small enough bit. Do what I do: improvise)
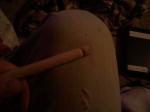
Once you have all the things you need, go ahead and start carving the beads out of the dowel. Make a small “V” groove all the way around the dowel, then just keep making the groove deeper and deeper until the bead comes apart from the rest of the dowel. Try your best not to let the bead break off. Here’s a (really bad) picture:

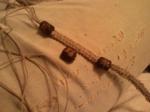
Go ahead and carve out three or four of these (or however many you want. It’s all up to you). Once you have this done, you will need to drill a hole through the middle of the beads (so you can put them on your jewelry). After that, it’s time to add your first layer of paint. When choosing your paint, it would be best to pick one dark color and one light color. I like dark, “earthy” colors, so I chose black and a light shade of brown. Paint the entire surface of the bead with one color, then let them dry. I strung them all on a piece of hemp cord, and tied each side of the cord to something.
Once the first layer of paint has dried, you can either put another coat of the same color on (I didn’t), or go ahead and pick out the symbols you want to put on them. I used kanji symbols (Chinese writing), but you can put whatever you want on them. If you opt to use kanji, here’s a link you can use to find some symbols: Tribalshapes.com.
Once you have symbols picked out, put some of the paint you have not used yet on a plate or something similar. Dip your toothpick in it, and carefully draw the symbols on the bead. Let this dry, and there you have it! Go ahead and add your beads to a necklacke or bracelet.
Notes:
-
You can sand the beads before painting them if you want. It will make them smoother and more “commercial” looking. However, they look more natural if you don’t. I chose not to.
-
Try not to get the beads wet, i.e. don’t wear your jewelry in the shower unless you picked out paint that is waterproof.
-
For a different look, make one of your beads two or three times the length of the others. Put this one in the middle of your piece, and put two or three symbols on it (or a phrase)
-
Keep experimenting. Try new things.
Here are a few more random pictures, just to help you out:
-
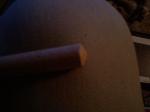
- Another style
-

- Carving tool
-
- Paint
Combining Knots – Monk’s Braid and Spiral January 25, 2009
Posted by Rock One in Ideas, Techniques.Tags: beads, crafts, Handcrafted, hemp, hemp crafts, hemp jewelry, hippy, Ideas, jewelry, jewelry making, macrame, photos, pictures, Techniques
add a comment
Since I wrote the post on the Monk’s Braid knot, I’ve been playing with different ways to use it. Here’s a necklace I’ve been working on the last few days. I used lampwork glass beads, and incorporated the spiral knot. Here’s a couple pictures (and I know they’re badly lit…sorry):


Simple enough. When I wanted to add the spiral knot, I just switched knots. I didn’t put any extra knots in between the monk’s braid and the spiral, although I’m sure it would look a little better if I had. I made sure I did exactly ten knots when using the spiral, just to make sure the spirals were all uniform. As the monk’s braid is more of a “solid” knot than the spiral, it almost seems like the necklace is a little weak where I switch knots. However, I’m sure that will go away after it is worn a few times and broken in. What do you think?
